
Installing Meta Pixel in React takes about 5 minutes using the @adkit.so/meta-pixel-react package. It provides a simple hook-based API with full TypeScript support.
Prerequisites
Before you start, make sure you have:
- A React 18+ application
- A Facebook/Meta Pixel ID (how to get your Pixel ID)
How to Install the Package
Install the @adkit.so/meta-pixel-react package:
npm install @adkit.so/meta-pixel-react
How to Initialize the Pixel
Wrap your app with MetaPixelProvider to initialize the pixel:
import { MetaPixelProvider } from '@adkit.so/meta-pixel-react';

ReactDOM.createRoot(document.getElementById('root')!).render(
    <MetaPixelProvider pixelIds="YOUR_PIXEL_ID" debug={true}>
        <App />
    </MetaPixelProvider>,
);
Then use the useMetaPixel hook anywhere in your app:
import { useMetaPixel } from '@adkit.so/meta-pixel-react';

function CheckoutButton() {
    const meta = useMetaPixel();

    function handleClick() {
        meta.track('InitiateCheckout');
    }

    return <button onClick={handleClick}>Checkout</button>;
}
That's it! Your pixel is now tracking page views automatically.
Alternative: Standalone Hook
If you prefer not to use a Provider, you can initialize directly with the hook:
import { useMetaPixel } from '@adkit.so/meta-pixel-react';

function App() {
    useMetaPixel({ pixelIds: 'YOUR_PIXEL_ID' });
    return <YourApp />;
}
Then use useMetaPixel() without config in child components. It will use the already-initialized instance.
How to Test if the Pixel is Working
Enable localhost tracking and debug mode during development:
useMetaPixel({
    pixelIds: 'YOUR_PIXEL_ID',
    enableLocalhost: true, // Enable for testing
    debug: true, // Show console logs
});
Verify Installation
If you enabled debug: true, check your browser console for Meta Pixel logs:
![]()
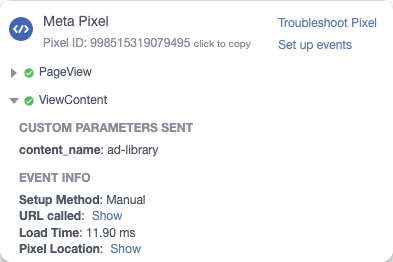
Install the Meta Pixel Helper Chrome extension. It will show a badge when pixels are detected:
![]()
How to Track PageView in SPAs
React apps are Single Page Applications (SPAs), so the browser doesn't reload between pages. The pixel tracks PageView once on initialization, but you need to track it manually on route changes.
With React Router
import { useMetaPixel } from '@adkit.so/meta-pixel-react';
import { useLocation } from 'react-router-dom';
import { useEffect } from 'react';

function App() {
    const meta = useMetaPixel();
    const location = useLocation();

    useEffect(() => {
        meta.track('PageView');
    }, [location.pathname]);

    return <Routes>...</Routes>;
}
With Next.js App Router
'use client';

import { useMetaPixel } from '@adkit.so/meta-pixel-react';
import { usePathname } from 'next/navigation';
import { useEffect } from 'react';

export default function RootLayout({ children }) {
    const meta = useMetaPixel();
    const pathname = usePathname();

    useEffect(() => {
        meta.track('PageView');
    }, [pathname]);

    return <html>...</html>;
}
autoTrackPageView: false if you want full control over when PageView fires.How to Track Events
Standard Events
import { useMetaPixel } from '@adkit.so/meta-pixel-react';

function PricingPage() {
    const meta = useMetaPixel();

    function handlePurchase() {
        meta.track('Purchase', { value: 99.99, currency: 'USD', content_ids: ['pro-plan'] });
    }

    return <button onClick={handlePurchase}>Buy Pro</button>;
}
You should see the event in the Meta Pixel Helper Chrome extension:
Track on Page Load
import { useMetaPixel } from '@adkit.so/meta-pixel-react';
import { useEffect } from 'react';

function BlogPost({ postId }: { postId: string }) {
    const meta = useMetaPixel();

    useEffect(() => {
        meta.track('ViewContent', { content_id: postId });
    }, [postId]);

    return <article>...</article>;
}
Custom Events
For events not in the standard list:
const meta = useMetaPixel();

meta.trackCustom('VideoWatched', { video_id: 'intro-video', duration: 120 });
What Events to Track in Your SaaS
For a typical SaaS funnel, track these events:
| Event | When to Trigger |
|---|---|
ViewContent | On page load of blogs, pricing or features page |
Lead | On form submit (newsletter, lead magnet, waitlist) |
CompleteRegistration | After successful account creation |
StartTrial | When user activates free trial |
Subscribe / Purchase | On subscription success page (use eventID for deduplication) |
Focus on conversion events (Lead, StartTrial, Subscribe). These are what you'll optimize your ads for.
Full Example
Here's a complete React project structure with Meta Pixel:
import { MetaPixelProvider } from '@adkit.so/meta-pixel-react';
import { BrowserRouter } from 'react-router-dom';
import ReactDOM from 'react-dom/client';
import App from './App';

ReactDOM.createRoot(document.getElementById('root')!).render(
    <BrowserRouter>
        <MetaPixelProvider pixelIds="YOUR_PIXEL_ID">
            <App />
        </MetaPixelProvider>
    </BrowserRouter>,
);
Common Issues and Fixes
Enable localhost in your config:
useMetaPixel({
    pixelIds: 'YOUR_PIXEL_ID',
    enableLocalhost: true,
});
Make sure you're not initializing the pixel multiple times. Only call useMetaPixel with config once at your app root:
// ✅ Root component - with config
useMetaPixel({ pixelIds: 'YOUR_PIXEL_ID' });

// ✅ Child components - no config
const meta = useMetaPixel();
The package has strict TypeScript types. Use standard event names:
// ✅ Correct
meta.track('ViewContent');

// ❌ Wrong - not a standard event
meta.track('ViewPage');

// ✅ For custom events, use trackCustom
meta.trackCustom('ViewPage');
For edge cases where you can't use hooks or wrap your app, use initMetaPixel:
import { initMetaPixel, useMetaPixel } from '@adkit.so/meta-pixel-react';

// Initialize before rendering
initMetaPixel({ pixelIds: 'YOUR_PIXEL_ID' });

ReactDOM.createRoot(document.getElementById('root')!).render(<App />);
Then use useMetaPixel() normally in your components.
Best Practices
- Wrap your app with
MetaPixelProvideronce at the root - Use standard events for better ad optimization
- Track ViewContent on page/route changes
- Add meaningful parameters (content_id, value, currency)
- Disable debug in production
Next Steps
- Set up conversion events in Events Manager
- Create custom audiences based on pixel data
- Use pixel events to optimize your ads
Resources
Frequently asked questions
We recommend using MetaPixelProvider as it follows React conventions. Alternatively, you can use the standalone hook approach by calling useMetaPixel with config once at your app root.
By default, the pixel won't fire on localhost to avoid polluting your data. Add enableLocalhost:true to your config to enable it during development.
The package automatically tracks PageView on initialization when autoTrackPageView is true (default). For subsequent route changes, call meta.track('PageView') in your router's navigation handler or use a useEffect in your layout component.
Yes! We have a dedicated Next.js package with automatic PageView tracking on route changes. See our Next.js installation guide for the easiest setup.
