
Installing the Meta Pixel in Nuxt takes about 5 minutes: install the @adkit.so/meta-pixel-nuxt package, add your Pixel ID to nuxt.config.ts, and you're tracking.
Video Tutorial
Prerequisites
Before you start, make sure you have:
- A Nuxt 3 or 4 application
- A Facebook/Meta Pixel ID (how to get your Pixel ID)
How to Install the Package
The fastest way is using the Meta Pixel Nuxt NPM package:
npx nuxi module add @adkit.so/meta-pixel-nuxt
npm install @adkit.so/meta-pixel-nuxt
pnpm add @adkit.so/meta-pixel-nuxt
yarn add @adkit.so/meta-pixel-nuxt
How to Configure Your Pixel ID
Step 1: Add the Module to Your Nuxt Config
If you installed manually with npm/pnpm/yarn, open your nuxt.config.ts and add the module:
export default defineNuxtConfig({
    modules: ['@adkit.so/meta-pixel-nuxt'],
});
npx nuxi module add, the module is automatically added to your nuxt.config.ts.Step 2: Add Your Pixel ID
Add your Pixel ID to the module configuration:
export default defineNuxtConfig({
    modules: ['@adkit.so/meta-pixel-nuxt'],
    metaPixel: {
        pixelIds: ['YOUR_PIXEL_ID_HERE'],
    },
});
For most cases, you'll have one pixel:
metaPixel: {
    pixelIds: '123456789012345';
}
If you need to track multiple pixels, pass an array:
metaPixel: {
    pixelIds: ['123456789012345', '987654321098765'];
}
That's it! Your Meta Pixel is now installed and will automatically track page views.
How to Test if the Pixel is Working
Enable Localhost Tracking
By default, the pixel won't fire on localhost to avoid polluting your data. To test during development:
metaPixel: {
  pixelIds: ['YOUR_PIXEL_ID_HERE'],
  enableLocalhost: true,  // Enable for testing
  debug: true             // Show console logs
}
Verify Installation
There are two ways to verify your pixel is working:
If you enabled debug: true, check your browser console for Meta Pixel logs:
![]()
Install the Meta Pixel Helper Chrome extension. It will show a badge when pixels are detected:
![]()
How to Track Custom Events
The module provides a useMetaPixel() composable for event tracking.
Basic Event Tracking
<script setup lang="ts">
onMounted(() => {
    useMetaPixel().track('ViewContent');
});
</script>
Standard Events with Parameters
Facebook supports many standard events. Pass parameters for richer data:
<script setup lang="ts">
const meta = useMetaPixel();

onMounted(() => {
    meta.track('ViewContent', {
        content_id: 'product-123',
        content_name: 'Premium Plan',
        value: 99,
        currency: 'USD'
    });
});
</script>
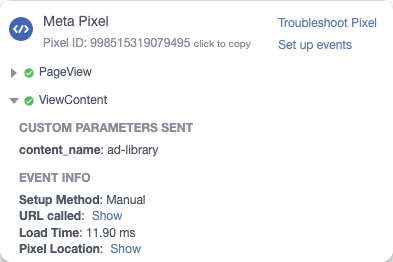
You should then see the following in the Meta Pixel Helper Chrome extension:
Custom Events
For events not in the standard list, use trackCustom():
<script setup lang="ts">
onMounted(() => {
    useMetaPixel().trackCustom('custom_event', { custom_param: 'whatever_you_want' });
});
</script>
What Events to Track in Your SaaS
For a typical SaaS funnel, track these events:
| Event | When to Trigger |
|---|---|
ViewContent | On page load of blogs, pricing or features page |
Lead | On form submit (newsletter, lead magnet, waitlist) |
CompleteRegistration | After successful account creation |
StartTrial | When user activates free trial |
Subscribe / Purchase | On subscription success page (use eventID for deduplication) |
Focus on conversion events (Lead, StartTrial, Subscribe). These are what you'll optimize your ads for.
How to Exclude Routes from Tracking
Prevent the pixel from loading on certain pages (like dashboards or admin areas):
metaPixel: {
  pixelIds: ['YOUR_PIXEL_ID_HERE'],
  excludeRoutes: ['/admin', '/dashboard/**']
}
The pixel won't initialize at all on excluded routes, keeping your analytics data clean.
Full Example
Here's a complete project example with Meta Pixel:
<template>
    <div>
        <h1>Welcome to Our App</h1>
        <button @click="handleSignup">Sign Up</button>
    </div>
</template>

<script setup lang="ts">
const meta = useMetaPixel();

onMounted(() => {
    meta.track('ViewContent', { content_id: 'homepage' });
});

function handleSignup() {
    meta.track('Lead');
}
</script>
Common Issues and Fixes
Make sure you've enabled localhost in your config:
metaPixel: {
  pixelIds: ['YOUR_PIXEL_ID_HERE'],
  enableLocalhost: true  // Add this
}
- Check the Meta Pixel Helper Chrome extension shows your pixel is loaded
- Enable
debug: trueand check console for errors - Events can take up to 20 minutes to appear in Facebook Events Manager
- Make sure you're looking at the correct pixel in Events Manager
The module has full TypeScript support. Make sure you're using standard event names:
// ✅ Correct - standard event
meta.track('ViewContent');

// ❌ Wrong - will show TS error
meta.track('ViewPage'); // Not a standard event

// ✅ Correct - use trackCustom for custom events
meta.trackCustom('ViewPage');
Verify the array syntax in your config:
pixelIds: ['123456789012345', '987654321098765']; // ✅ Correct
pixelIds: '123456789012345'; // ❌ Wrong for multiple pixels
Best Practices
- Use standard events whenever possible for better ad optimization
- Add meaningful parameters to events (content_id, value, currency)
- Exclude internal routes (dashboard, admin) to keep data clean
- Disable debug in production to reduce console noise
- Track the full funnel: ViewContent → AddToCart → InitiateCheckout → Purchase
Next Steps
Now that your pixel is installed:
- Set up conversion events in Events Manager
- Create custom audiences based on pixel data
- Use pixel events to optimize your ads
Resources
Frequently asked questions
By default, the pixel won't fire on localhost to avoid polluting your data. Add enableLocalhost:true to your metaPixel config in nuxt.config.ts to enable it during development.
Events can take up to 20 minutes to appear in Facebook Events Manager. Check that Meta Pixel Helper shows your pixel is loaded, enable debug:true in your config, and verify you're looking at the correct pixel in Events Manager.
The module has full TypeScript support with strict event name validation. Use standard events like ViewContent or Purchase with meta.track(). For custom events not in the standard list, use meta.trackCustom() instead.
Verify you're using array syntax in your config. Use pixelIds:'123456789012345', '987654321098765' with an array, not a single string.
